In a previous post I talked about how we could create command type notifications to execute shell scripts when a trigger is fired by an event in Zenoss. Also, in a more recent post I explained how a ZenPack could automatically create these triggers and notifications when installed by defining them in JSON format.
In this post I will explain how to create additional custom action types that can be used by notifications for different purposes.
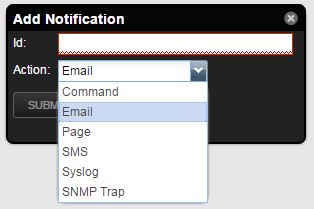
Zenoss Default Notification Actions
By default, Zenoss comes with a built-in notification action types. You can see them when creating a new notification from the user interface:
These action types are:
Command: Runs an executable script. Discussed in one of my previous posts.
Email: Sends an e-mail to a user.
Page: Sends a message to a user's pager, also known as beeper. Probably safe to say that this is not used by anyone anymore.
All these notifications are sent when an event matches a trigger rule.
Creating the New Action
Next, we are going to learn how we can create and add a new fully functional custom action to this list, using a ZenPack. For this example, let's assume that we want to create a new SMS action to send SMS messages. Surely something more modern and useful than a Pager!
Cocoon is a very popular gem to add nested resources functionality in Rails. It allows you to add or remove “mini forms” of another model into a main model's form and create all objects at once when the form is saved.
I was recently finding myself trying to implement a similar functionality using only Rails 5 API and JSON API specification.
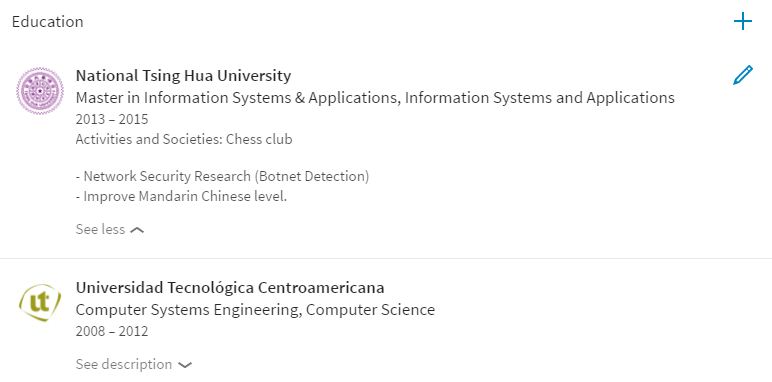
As an example, we will try to implement the commonly seen Work Experience and Educational Background features seen in sites such as LinkedIn, where the user can add many items for these categories. The user's profile and all items for those categories (which are separate models) should all be saved at once, once the form is submitted.
accepts_nested_attributes_for
accepts_nested_attributes_for allows us to save attributes on associated records (work experience, educational background) through a parent record (user). By default nested attribute updating is turned off and you can enable it using the #accepts_nested_attributes_for class method.
In a previous post I talked about how to use triggers and command notifications in Zenoss to trigger custom actions when certain events occur. All of this was done using the Zenoss user interface.
In this post we will achieve something similar, but from a custom ZenPack. At the end of this post, our custom ZenPack will be able to create new custom triggers and notifications when installed.
Defining ZenPack Triggers & Notifications
Triggers and notifications within a ZenPack are actually defined using JSON. To do so, you must create a file named actions.json in a directory called zep (create it if it doesn't exist), within the ZenPack's top directory.
RRDTool is a program that works with Round Robin databases (hence RRD). This type of database is more geared and limited towards storing time series data.
Moreover, rrdtool also doesn't store the data handed to it. Instead, it first re-samples the data and then stores this re-sampled data. Since rrdtool deals with time series data, it knows that certain data is meant to be stored every certain period of time (i.e 5 minutes). This newly re-sampled data will be the same as the original data, but the stored numbers will be different.
This means that if for example, we were to store some data every 5 minutes, a data sample that arrives at the 03 minute mark cannot go into the database, therefore it has to be re-adjusted into the correct slots. While rrdtool makes this adjustment, it will also change the value, so that this new value still represents the space in the curve.
In rrdtool, each database table is stored in a separate .rrd file. This means that one file represents one table.
We can create a database using the following command:
One important parameter here is the step parameter. This means that rrdtool will re-sample all the data that is fed into the database to a 300 second interval. Still, data can be fed as quickly as desired (i.e a lot of data in one second), however the data will be re-sampled to 300 seconds on storage. This means that it only stores data every 300 seconds. Because of this re-sampling, rrdtool will not accept data from the past.
Gnocchi is a multi-tenant timeseries, metrics and resources database. It provides an HTTP REST interface to create and manipulate the data. It is designed to store metrics at a very large scale while providing access to metrics and resources information and history.
It is the preferred storage method for metrics in Ceilometer, as of OpenStack Ocata.
In this post I want to dive into Gnocchi specifics such as its configuration, supported backends, APIs, daemons, and source code.
Configuration
Gnocchi's configuration is stored in a file called gnocchi.conf. Ideally, this file would be in ~/gnocchi.conf or /etc/gnocchi/gnocchi.conf. Let's take a look at a basic Gnocchi configuration:
The configuration above sets up Gnocchi to use Postgresql as the indexer, and use the file system for storage. Additionally it sets up CORS so that requests from any origin are allowed. You will want to configure CORS in a more secure manner when deploying to a production environment.
Database Setup
For this example, we are going to use Cloud 9 as our environment, and Postgresql as the database. This means that we need to first setup the database before we start using Gnocchi.
Make sure the Postgresql service is running:
sudo service postgresql start
We can enter the Postgresql command line using:
sudo sudo -u postgres psql
Now let's create a new Postgresql user:
CREATE USER gnocchi SUPERUSER PASSWORD 'gnocchi';
Then create the database:
CREATE DATABASE gnocchi WITH TEMPLATE = template0 ENCODING = 'UNICODE';
When the database is finally set up correctly and the configuration file is in place, we can initialize the indexer and storage:
gnocchi-upgrade
You should see the following output logs:
2017-05-17 05:28:50.917 3895 INFO gnocchi.cli [-] Upgrading indexer <gnocchi.indexer.sqlalchemy.SQLAlchemyIndexer object at 0x7ff76cff6190>
2017-05-17 05:28:50.982 3895 INFO alembic.runtime.migration [-] Context impl PostgresqlImpl.
2017-05-17 05:28:50.982 3895 INFO alembic.runtime.migration [-] Will assume transactional DDL.
2017-05-17 05:28:51.011 3895 INFO alembic.runtime.migration [-] Context impl PostgresqlImpl.
2017-05-17 05:28:51.011 3895 INFO alembic.runtime.migration [-] Will assume transactional DDL.
2017-05-17 05:28:51.154 3895 INFO gnocchi.cli [-] Upgrading storage <gnocchi.storage.file.FileStorage object at 0x7ff7688f9710>
Gnocchi REST API
Gnocchi's REST API is based on Pecan, a very lightweight Python web framework that provides object-dispatch style routing. We can confirm this in Gnocchi's rest/__init__.py file:
importpecanfrompecanimportrest
Metrics
Gnocchi provides an object type that is called metric. A metric designates any thing that can be measured: the CPU usage of a server, the temperature of a room or the number of bytes sent by a network interface.
A metric only has a few properties: a UUID to identify it, a name, the archive policy that will be used to store and aggregate the measures.
Farther down the code in rest/__init__.py, we can find a metric controller which inherits from a Pecan REST controller:
From the Pecan documentation, we can learn that Pecan uses a routing strategy known as object-dispatch to map an HTTP request to a controller, and then the method to call. Object-dispatch begins by splitting the path into a list of components and then walking an object path, starting at the root controller.
We can tell Pecan which methods in a class are publically-visible via expose(). If a method is not decorated with expose(), Pecan will never route a request to it. In the example above, the get_all() method is exposed to Pecan. Additionally, it makes use of Pecan's built-in support for a special JSON renderer, which translates template namespaces into rendered JSON text. Meaning that the returned content will be rendered as JSON.