Middleman is an excellent static site generator written in Ruby. It is extremely practical for blogging as well, and it's the framework I am currently using for this blog.
Unfortunately Middleman's documentation is a bit unorganized and incomplete. I often find myself browsing through the source code to understand how to use or implement some custom features.
For example, using redcarpet I wanted to be able to create some re-usable “markdown components” that I could use in my blog posts. Something like bootstrap alerts, so that I could re-use them without having to add HTML or any code to my markdown.
And this post I am going to explain how to integrate this functionality into your blog using Middleman.
Creating a Custom Renderer
Middleman comes built in with a custom Redcarpet renderer which Middleman uses to parse the links and images (and possibly other things) in your blog's markdown. To be able to implement our custom markdown we need to create our own custom renderer, which should inherit from Redcarpet::Render::HTML. However, the key thing here is to actually inherit directly from Middleman's renderer (which of course, inherits from Redcarpet::Render::HTML).
To begin, we will create a lib (if it doesn't exist) under our blog's directory and create a file named markdown_helper.rb inside it. The initial contents of this helper will be:
In a previous post I went over the basic and most common Big O notations along with respective common algorithms, and finally adding some Ruby benchmarks for each.
However I did not cover some other very important concepts in Big O notation: Omega and Theta.
Understanding Omega
The Omega symbol (Ω) represents a certain algorithm's best-case asymptotic complexity. For example, let's take again a look at the binary search algorithm:
Previously we determined that the Big O notation for this algorithm is O(log n). This represent the worst asymptotic complexity that the algorithm can possibly have.
The Ruby Benchmark library helps us to measure how long it takes for a block of code to run. Similar to when you subtract starting time and ending time in other languages such as Java.
I was doing some Big O Notation reviewing with Ruby the other day and did some common algorithm implementations for each of the most common Big O notations, just for fun.
Using Benchmark
To start benchmarking our code, we simply need to require benchmark and use the methods provided by the Benchmark module. For me, the most practical way is to use Benchmark#bm method, where we pass a block of code we want to measure:
The Enumerator class in Ruby allows us to generate some very smooth and useful infinite sequences. For example, in some Project Euler problems it is required to generate sequences without a specific limit. A good example of this is the Highly Divisible Triangular Number problem:
The sequence of triangle numbers is generated by adding the natural numbers. So the 7th triangle number would be 1 + 2 + 3 + 4 + 5 + 6 + 7 = 28. The first ten terms would be:

1, 3, 6, 10, 15, 21, 28, 36, 45, 55, ...

Let us list the factors of the first seven triangle numbers:

     1: 1
     3: 1,3
     6: 1,2,3,6
    10: 1,2,5,10
    15: 1,3,5,15
    21: 1,3,7,21
    28: 1,2,4,7,14,28

We can see that 28 is the first triangle number to have over five divisors.

What is the value of the first triangle number to have over five hundred divisors?
So first we would want to be able to generate a (infinite) sequence of triangular numbers that we can use to do many programming operations, such as iterating over the sequence.
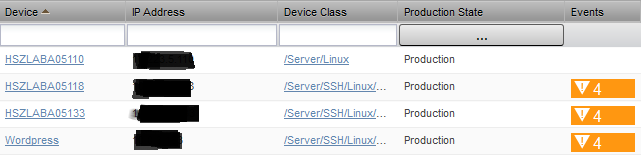
This is the table in the infrastructure page that shows all devices being monitored by Zenoss. Default columns include device name, device class, IP address, production state, and events, as shown in the image below:
However it would be nice to also include the power status we added to the device detail bar in the previous post, maybe even add the ping status as well (why Zenoss doesn't do this by default is beyond me).
DevicePanels.js
The source code for the grid is found in $ZENHOME/Products/ZenUI/browser/resources/js/zenoss/DevicePanels.js. A quick glance at it and you will quickly find the definitions of the columns I mentioned earlier, defined in an array called deviceColumns.